

If you’ve been following along with The Hidden Garden for a while, you already know that hydrangeas are one of my absolute favorite flowers. There’s just something about their lush, cloud-like blooms that instantly brightens a space — whether it’s a single stem in a bud vase or a big, full arrangement on the dining table. I love all hydrangea varieties: blue, pink, white, green, antique, and even the moody purple tones that arrive late in the season. Each has its own charm and personality.
At home, I often cluster hydrangeas together in one large vase — it’s such an effortless way to make a statement. Some of the blooms dry beautifully, while others wilt a bit faster (and if you haven’t yet, check out our tutorial on reviving wilted hydrangeas — it’s one of our most-loved how-tos!).
But today, I want to show you how to transform hydrangea blooms into a gorgeous, long-lasting wreath that celebrates this classic flower in a new way. A hydrangea wreath adds texture, color, and natural beauty to any door or wall — and the best part is that you can make it yourself with just a few simple materials.
Why Hydrangeas Make the Perfect Wreath Flower
Hydrangeas are ideal for wreaths because of their full, rounded heads and hearty petals. When properly chosen and dried, they retain their shape and subtle color beautifully. Not all varieties dry the same, though, and that’s one of the most important tips before you begin.
Look for antique green hydrangeas or antique marble varieties — these are the best for drying. Their petals are a bit thicker and more leathery, which helps them hold their shape. Lighter pink, white, or pastel blue hydrangeas tend to wilt rather than dry, so avoid those if your goal is a long-lasting wreath.
You can create your wreath using fresh hydrangeas and let them dry naturally on the base, or start with already-dried blooms from your garden. Either way, this wreath will age gracefully, shifting in color from vibrant greens to soft, faded tones over time.
Supplies You’ll Need
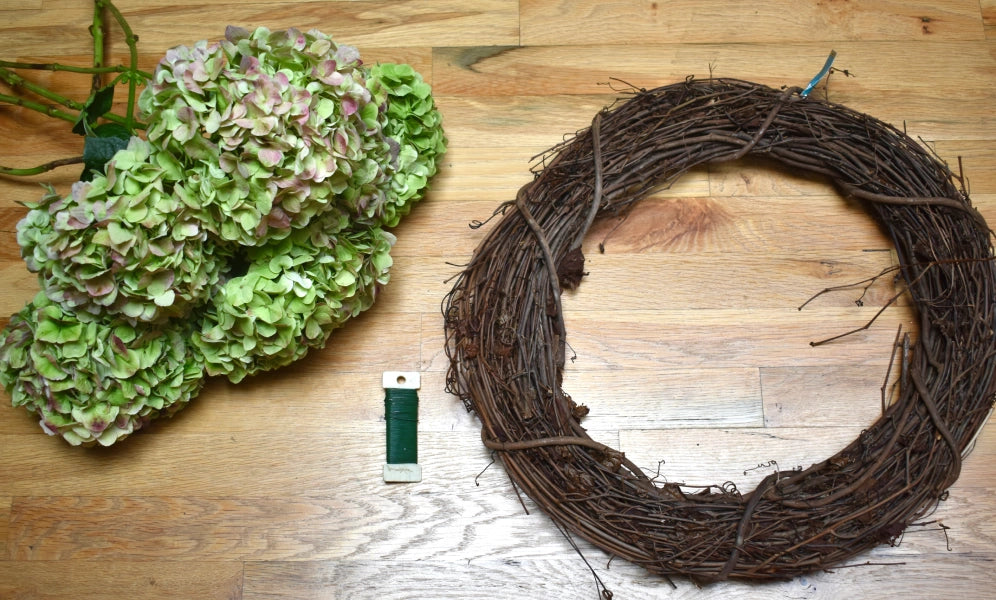
Before you dive in, gather your materials so everything is ready to go:
-
1 grapevine wreath base (available at most craft stores or online)
-
Clippers or floral shears
-
Spool wire (thin floral wire works best)
-
12–15 stems of antique green or antique marble hydrangea
-
Optional: Ribbon for hanging or finishing the wreath
-
Optional: Floral adhesive (if needed for extra security)
The grapevine wreath is my favorite base because its natural texture pairs perfectly with the hydrangea’s organic look. It also has gaps that make it easy to tuck stems securely between the vines.
Step 1: Prep Your Hydrangeas
If you’re cutting hydrangeas fresh from your garden, do so in the morning when the blooms are fully open but before the heat of the day sets in. Strip off the leaves and trim the stems to about 6 inches long.
If you’re using dried hydrangeas, gently shake off any debris or dust, and give them a light mist of water before starting. This helps soften the stems slightly so they’re easier to work with.
Step 2: Start Your Base Layer
Lay your grapevine wreath flat on your workspace. Take one hydrangea stem and gently insert it into the vines, pushing the stem about an inch or two deep so it feels snug. Continue adding stems in the same direction around the wreath — think clockwise — overlapping each bloom slightly to create a lush, full appearance.
You’ll start to see your wreath take shape as the big hydrangea heads fill the circle. Don’t worry if it looks a little uneven right now — that’s normal! You’ll adjust and fill in as you go.
Step 3: Fill in the Gaps
Once you’ve made it around the wreath once, take a step back and look at where you might see spaces or gaps. This is where your smaller “legs” or side stems of hydrangea come in handy.
Trim those smaller offshoots and tuck them into the empty areas, using spool wire if necessary to secure them. You want your wreath to look natural and dimensional — not perfectly symmetrical. The slight variations are what make it beautiful.
If you’re having trouble inserting any stems (especially if the grapevine is tight), wrap a bit of spool wire around the hydrangea stem and the base to hold it in place. Floral adhesive can also help for extra support, but generally the wire and grapevine texture are enough.
Step 4: Secure and Shape
When you’ve filled your wreath completely, gently lift it upright and give it a little shake to make sure nothing is loose. If any blooms wobble or shift, secure them with more wire around the back.
Now take your spool wire again and wrap a small loop at the top of the wreath — this becomes your hanger hook. You can also tie a decorative ribbon over the top if you’d like a softer, finished touch.
At this point, your hydrangea wreath will look fresh and vibrant. You can leave it as is if you’re hosting a gathering soon, or let it dry naturally for a longer-lasting piece.
Step 5: Let It Dry Naturally
This part is easy — just hang your wreath in a cool, dry place out of direct sunlight and humidity. Over the next couple of weeks, you’ll see the petals start to fade into their vintage, papery state.
The transformation is part of the beauty! Antique green tones turn sage and beige, blues soften into dusty gray, and pinks become muted rose. The wreath will feel delicate, but if left undisturbed, it can last for months — even up to a year.

Optional Touches
Once your wreath is fully dried, you can personalize it a few ways:
-
Add ribbon or silk bows that match your décor.
-
Tuck in small dried elements like eucalyptus, preserved berries, or dried lavender for added texture.
-
Dust lightly with a hairdryer on the cool setting if you need to remove any buildup.
If you’d like to preserve it even longer, you can lightly mist it with hairspray to help hold the petals in place
.
Where to Hang Your Hydrangea Wreath
I love hanging mine on an interior door, over a mirror, or even on the wall above a console table. Because hydrangeas are delicate once dry, avoid hanging your wreath outdoors where it will be exposed to full sun or moisture.
Inside, it brings an instant sense of charm and organic beauty — a little reminder of the garden that lasts long after the blooms have faded outdoors.
A Final Tip from The Hidden Garden
If you fall in love with this project (and I think you will!), try experimenting with color-blocked wreaths using different hydrangea tones grouped together — green and blue for a coastal feel, or pinks and purples for something more romantic.
And if you ever end up with wilting hydrangeas before you get to your wreath, don’t toss them! Revisit our “How to Revive Your Hydrangeas” tutorial for a quick refresh — it’s a game-changer.
Creating with flowers doesn’t have to be complicated. It’s about enjoying the process and letting the natural beauty of each bloom shine through. A hydrangea wreath is a simple, satisfying way to bring a bit of your favorite flower into your home — and it’s one of those projects that always turns out beautifully, no matter your skill level.
So go ahead, grab your clippers, pour yourself a cup of coffee (or wine — no judgment!), and start building your wreath. I promise, once you see those lush hydrangeas come together in a circle of texture and color, you’ll fall in love all over again — just like I do, every single time.
